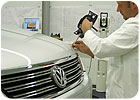
Volkswagen’s glass-enclosed “Transparent Factory” in Dresden, Germany, not only assembles the company’s top-end Phaeton automobile; it is also employs a cutting-edge assembly line that seamlessly integrates both automated and manual work processes. The line includes 29 concentrically arranged assembly stations along with a series adjustable lifters, which are used to position the vehicles on the different stations, or “segments,” as needed. In many ways the plant looks more like a high-tech trade workshop than an assembly-line operation, thanks to its gleaming hardwood floors and baskets of kitted components close at hand at each station.
Vehicle assembly operations take place on two floors, with a suspended railway system linking the two levels. The facility includes a 120-foot-high glass tower where automobiles await pickup by their new owners. Customers who order a Volkswagen Phaeton can actually come and watch their own vehicle being assembled. Taking delivery of a new Phaeton is a red-carpet event that includes a visit to Dresden’s world-famous Semper opera house.
Central to the success of this manufacturing effort is the plant’s metrology department, headed by Frank Herold. The department calibrates and sets production tools, and inspects the cars’ subassemblies and body shells. In addition, it measures the various external parts making up the cars to ensure they fit correctly.
Historically, Herold’s department employed an off-site, large-scale measurement facility, which included various conventional coordinate measurement machines. However, the system, while effective, was cumbersome and expensive. To streamline the process, Herold implemented a pair of T-Probe wireless laser measurement systems from Leica Geosystems (Norcross, GA).
“We wanted to implement a versatile measurement system that would allow us to cut the time needed to inspect a finished vehicle,” Herold says. “Thanks to our migration to two Leica T-Probe systems, we were able to cut the time needed to inspect a vehicle by at least four or five hours. Plus, the time and effort normally invested in the maintenance and alignment of the setting masters became history. What we have effectively done is cut end inspection times in half.”
To maximize efficiency, Volkswagen employs the T-Probes in tandem, with both probes performing measurements in the same coordinate system. One system inspects the front end and left side of the car. The second system inspects the car’s rear and the right-hand side. This “doublet” configuration makes it possible for operators to access all sides of a vehicle without having to reposition the trackers. Inspections that would otherwise take an entire day can now be completed in three or four hours. Because the probes are fully portable, they can be used throughout the factory.
“In the future, we plan to introduce laser scanning of surfaces, which will make the measurement processes even more time-efficient,” Herold says. “Thanks to our [doublet] system, we have effectively halved inspection times on finished vehicles and have at the same time gained an unsurpassed level of versatility.”
For more on laser trackers, visitwww.leica-geosystems.com/usor call 800-367-9453.