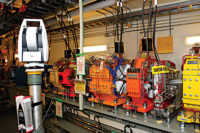
The Airbus Consortium (Toulouse, France) plant in Bremen, Germany, manufactures wing components such as landing flaps, producing approximately 2.5 million metal parts annually for the entire range of Airbus aircraft. It also performs wing assembly for the A330 and A340 jetliners.
For the past few years, it has relied on mobile laser measuring techniques using laser tracking systems from the Metrology Division of Leica Geosystems AG (Unterentfelden, Switzerland) to ensure that its production equipment and products are configured to the correct dimensions.
"We received our first laser tracker in January 1999," says Erwin Hoffmann, leader of the plant's measurement technology department. "Because of the types of problems we were confronted with...in connection with production of the EF200 Eurofighter, we needed to acquire either a larger stationary measurement system or a more flexible system. We therefore carried out a comprehensive benchmarking exercise. The Leica tracker emerged clearly as the best measurement system for us on the grounds of both speed and cost efficiency."
Today, the plant uses three LTD500 Leica laser trackers and four state-of-the-art LTD800 models. Each laser tracker functions as a mobile coordinate measurement system equipped with a laser interferometer to carry out rapid, precise measurements. Each tracker can make single-point or surface measurements from a single setup position, with a measurement volume up to 80 meters in diameter at a measurement rate of 3,000 points per second.
Laser trackers are widely used in high-precision tool manufacturing and geometrical examination applications in the automotive and aviation sectors. Periodic inspections, repetitive testing, parts mating and alignment, and other measurement tasks can be carried out automatically with the help of the laser tracker's integrated absolute distance meter.
Because the setup procedure for the laser trackers is flexible and fast, a single tracker can be adapted to a variety of tasks. For example, the trackers are deployed during setup and approval of production machinery, during structural assembly of all large components, during individual subcomponent production, and for conducting cause-of-error investigations. The collimation of tracks and landing flaps during the preparation of wing assemblies for the A330 and A340 is also performed using the mobile measurement system.
Recently, the Bremen plant began using the wireless, armless Leica T-Probe to inspect hidden points that were largely unreachable using traditional probing technologies. According to Hoffman, the device has proved especially valuable in the manufacture of landing flaps. In the past, although his team was able to make its measurements with a tracker at just one or two separate locations, the flaps themselves had to be rotated to acquire all the necessary dimensions. With the T-Probe, measurements can be made with the piece in a single setup.
"The T-Probe...results in a major time savings," Hoffman says. "This is because both the handling of the flaps, and the setup and preparation of the measurement process can be done more rapidly. In addition, the calculation process and the evaluation process become easier and more reliable, because we no longer need to factor in reference points.
"The laser trackers have met our requirements in every conceivable way....We now also plan to purchase two more Leica trackers. In the framework of the A400M [military transport aircraft] program, which gets under way in 2006, we will have several stations with permanently integrated tracker systems....Trackers will be used in the context of quality assurance procedures for the A400M, for examination of interfaces and handoffs before the fuselage is sent to the final assembly line in Spain."
For more information on laser measuring call 800-367-9453 (ext. 1611), visit www.leica-geosystems.com or eInquiry 2.
