advertisement
How To Set Up a Press Fit on a Servo Press in 30 Minutes or Less
So, you’ve decided to upgrade your current hydraulic or pneumatic press-fit process to a Servo Press. Good. The servo press will give you more control, diversity and repeatability than you’ve grown used to. That, and the ability to collect, analyze and save cycle and force curve data. And, not to mention, being quieter, cleaner and much more energy efficient. But, moving from a pneumatic or hydraulic press to Servo Press can be very intimidating for many people. Especially when it comes to the setting up and programming.
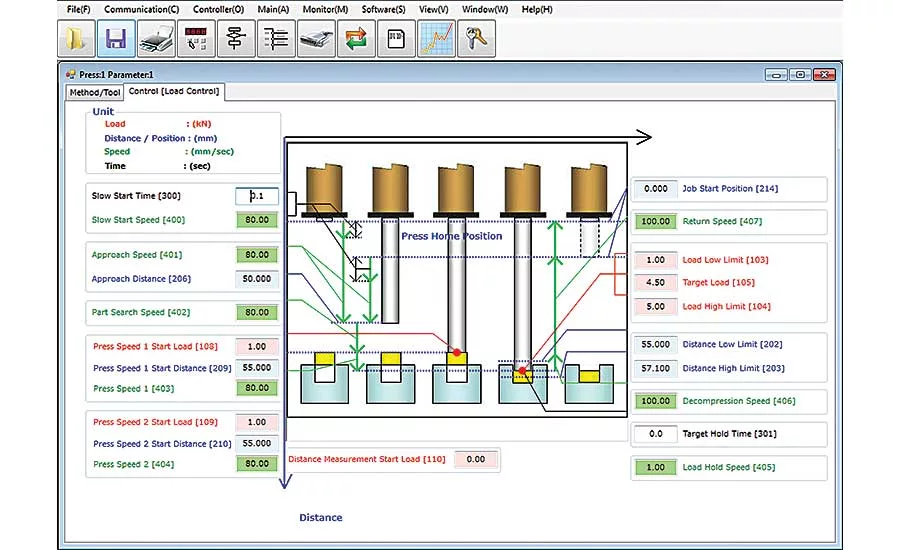
FEC’s press software was designed just for that reason. It uses innovative picture-based programming screens with easy-to-understand setting descriptions (IE: Approach Speed, Target Load, Press Speed, Load Hold Time, etc.). The setting descriptions and values are even color-coded according to the function they perform (Red – Force Settings, Blue – Distance Settings and Black – Time Settings).
Still intimidated? Well, new users can opt to have the software automatically set default setting values based off of what press is connected, even if the user doesn’t know himself (the software can read the ID chip built into the FEC press unit). This way the press can be running, right out of the box, in just a few minutes.
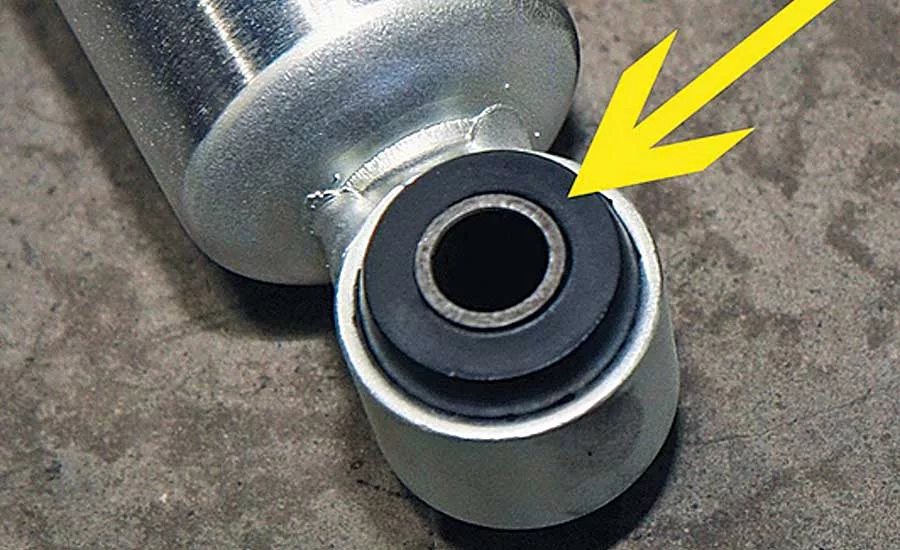
So, now that you’ve gotten over your initial programming fears, let’s go and set up a part; in your case, pressing a rubber bushing into a shock absorber.
Because you are bottoming out the tooling to set the correct bushing position, we will initially press to a Target Load value. Now, we need to set the Target Load to a value high enough to make sure we fully press the bushing (known high limit or maximum press rated load, etc.).
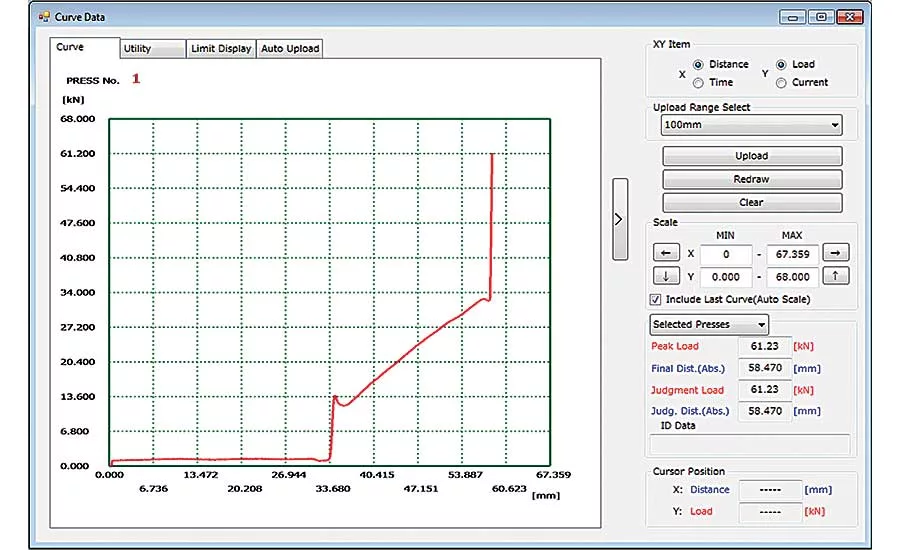
After we’ve finished pressing the bushing, let’s look at the generated force curve. The FEC software’s CURVE screen shows us a scalable graph along with the final force and distance values. Also, when we move our cursor around in the graph area, we can see what the load and distance is at the cursor position. If we move our cursor to where the curve just begins to rise, we can determine that the bushing first entered the shock bore at 34.151mm. And, according to the screen, the final distance was at 58.47mm.
Now let’s go back and tweak our program based off of this information.
Looking for quick answers on assembly and manufacturing topics? Try Ask ASM, our new smart AI search tool. Ask ASM
When you are assembling parts with a very tight press-fit (IE: the part that you are pressing is considerably larger than the bore it is being pressed into), the press needs to be slowed down to its slower “Press Speed” before it contacts the bore. This is to limit shock forces generated as the parts come together, which could eventually damage the press and/or tooling. Since we know that, according to our graph, the bushing contacts the shock at 34.151mm., we should set our PRESS SPEED 1 DISTANCE (the distance where we change to Press Speed) to at least 1mm before that (33mm). Since we know that our tooling contacts the shock at 58.47mm (Final Distance), we can set our PRESS SPEED 2 DISTANCE to 1.5 ~ 2.0mm before that (57mm).
We will initially set our Approach Distance at 10mm before part contact and set our speeds as recommended for the size of the press were using.
Later, we can add some in-process quality “checks”; Interference Check, Part Check, Band Check, etc.. All with the same simple, picture-based ease of the initial part setup.
FEC’s DSP3000 Servo Press along with the AFC3000 Fixtured Nutrunner, HFC3000 Handheld Nutrunner, MICRO Nutrunner products and complete turn-key machines provide a complete one-stop solution for all of your assembly requirements.
Looking for a reprint of this article?
From high-res PDFs to custom plaques, order your copy today!


