Best Practices in Crimp Applicator Maintenance
Schleuniger recommends preventative maintenance and proper setup to ensure crimp quality
Properly lubricated and cleaned applicators can prevent tooling damage. Photo courtesy Schleuniger Inc.
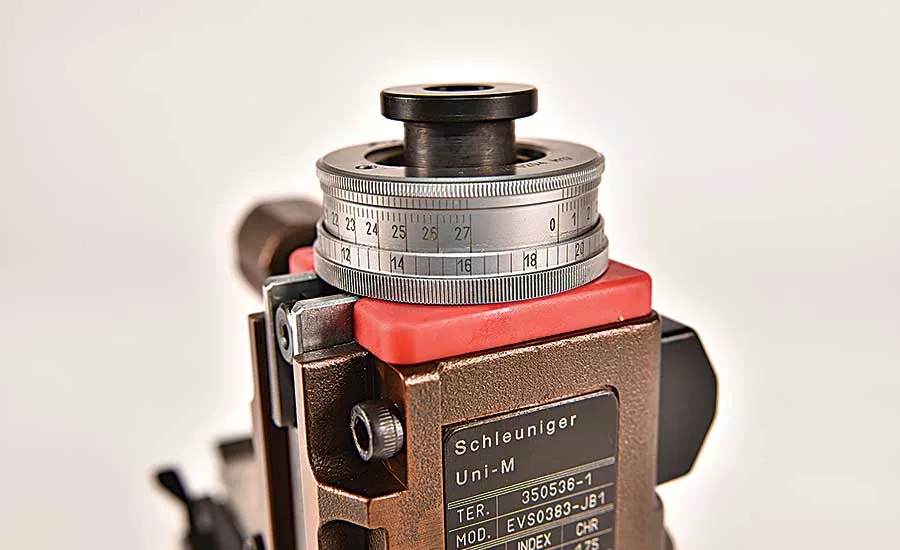
A ram collar (red piece shown in the photo) prevents collisions between the upper and lower tooling when the applicator is not installed in a press. Photo courtesy Schleuniger Inc.
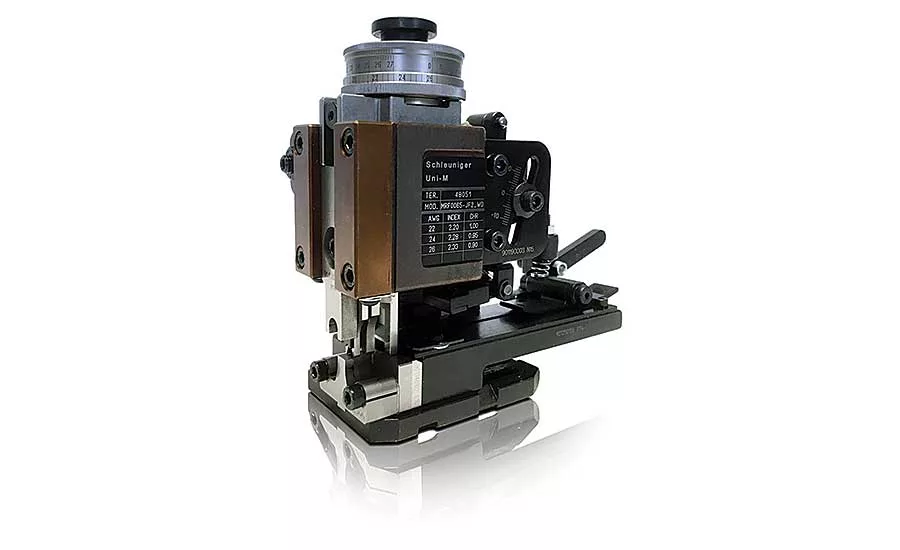
The Uni-M is a crimp applicator for use in both automatic and semi-automatic benchtop crimping machines designed for use with side and end feed, banded terminals of open or closed barrel construction. Photo courtesy Schleuniger Inc.
With standards for wire harnesses getting tighter, harness assemblers are increasingly using crimp force monitors to ensure quality connections. However, that technology can only tell you how well the crimping process is working. It can’t make the process better.
Rather, one of the most significant factors in crimp quality is an applicator that is in good condition. Applicator maintenance is essential to any crimping process, but many companies neglect this task or simply don’t know what is needed.
If you follow these recommendations for maintaining applicators, you will ensure high quality output and years of trouble-free performance. This article includes Schleuniger’s recommendations, as well as feedback from suppliers of crimping applicators, including TE Connectivity, Panduit, Molex, Hanke, Applitek and Mechtrix.
Preventative Maintenance
All machinery, including crimp applicators, should have a detailed preventive maintenance plan outlining service intervals and required steps. The plan should be well documented and key personnel should be thoroughly trained to ensure it is properly carried out.
The most important, and simplest, part of applicator maintenance is keeping the applicator clean and free from excessive dirt and terminal scraps. Applicators should be cleaned using a soft bristle brush and never with compressed air, as this tends to blow particles into cracks and crevices which could lead to further problems.
Applicators should get a basic cleaning daily or after each shift and a thorough cleaning should be done weekly or every 25,000 cycles. A thorough cleaning requires complete disassembly of the applicator to remove dirt and metal scraps from the tooling, the slides, and the feed track. While the applicator is disassembled, the condition of the crimping dies and anvils should be checked to ensure there is no damage.
Applicators should be lubricated once per day. Synthetic lubricants and greases such as Permatex (with PTFE), Super Lube and Chevron Ultra Duty are commonly recommended. Synthetic motor oil, such as SAE 20 or 30, is also recommended as an inexpensive and easily accessible substitute. Simple 3-in-One Oil is commonly used as well.
Looking for quick answers on assembly and manufacturing topics? Try Ask ASM, our new smart AI search tool. Ask ASM
A light coating of lubricant is needed on any component that might see friction. The slides and tooling should be thoroughly coated. However, an excess of grease can trap dirt and debris.
A terminal oiler is recommended for gold-plated terminals. Because gold is so soft, it will rub off and start to coat the crimp tooling. Eventually, the buildup causes the terminals to stick excessively in the crimp tooling. A terminal oiler minimizes this buildup.
Sometimes applicators must be taken out of use and stored for a long time. Prior to long-term storage, make sure the applicator is well cleaned, lubricated and wrapped in plastic to prevent rust. This will ensure that it will be in good condition if it is needed again in the future.
Tooling Setup and Maintenance
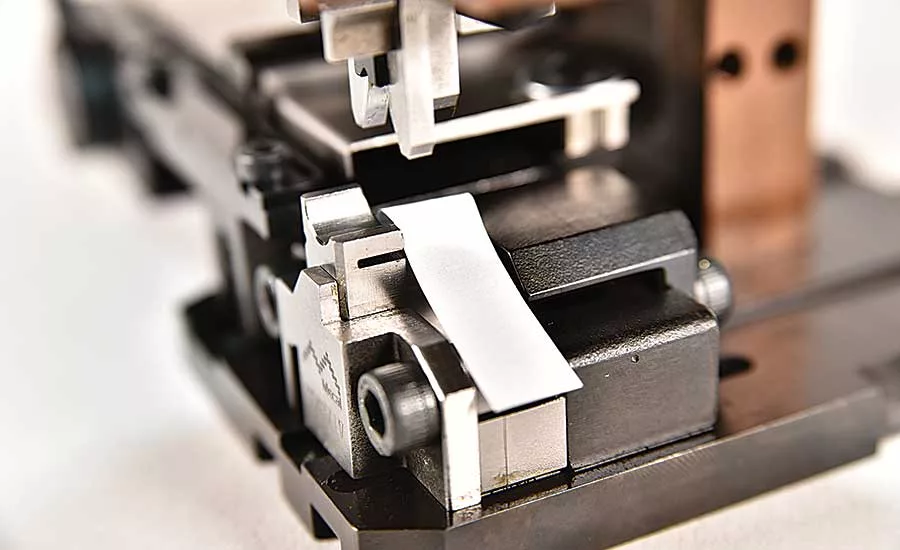
Tooling must be mounted properly to prevent excess wear. When replacing tooling, ensure that mounting surfaces are clean and in good condition. Crimp tooling must sit flush with the base plate and applicator ram. The upper tooling, or crimp dies, must be centered over the lower crimp anvil. A simple method to ensure that the upper tooling is centered is as follows:
1. Install the lower and upper tooling and hardware but do not completely tighten the screws.
2. Gently install the applicator ram ensuring the upper tooling does not contact the lower tooling.
3. Lay a thin strip of paper over the lower crimp anvil.
4. Gently but firmly push the upper tooling down over the anvil. While keeping downward pressure on the ram, tighten the screws to secure the upper and lower tooling.
Once you are sure that the tooling is installed properly, ensure that the terminal feed adjustment provides accurate terminal placement. This applies for pneumatic, mechanical or motorized feeds. However, when working with a mechanical feed applicator, consider the press it will go into. Depending on the quality of the terminal brake, the feed adjustment might differ between a slower press, like an older bench press, and faster presses which are common on automatic machines.
Most applicators are shipped with ram collars. The ram collars prevent collisions between the upper and lower tooling when the applicator is not installed in a press that might damage the tooling prematurely. Signs of tooling damage may be scarring or marking inside the upper crimp die which can also appear as consistent marking on the crimped terminal. Rounded edges on the crimp anvil revealed by excessive flash or burrs on the terminal are another sign of damage.
Whenever an applicator is installed into a press, it is recommended to either hand-cycle or cycle the press in jog mode two or three times to ensure the tooling closes properly without collisions.
Presses should be checked regularly to confirm that they are set for the proper shut height. For most mini-style applicators, the standard shut height is 135.78 millimeters ± 0.02 or 5.345 inches ± 0.0008. If the shut height on one press is set too low, this may cause the tooling to crash. Furthermore, when presses are properly adjusted for shut height, consistent results can be expected when applicators are moved between presses. Shut heights can be confirmed using simple shut height gauges or with press analyzers which are readily available on the market.
A thorough training program can save costs and increase efficiency. Operators and technicians should be trained on crimp quality indicators and other indicators surrounding basic applicator operation such as setup and handling. They should also be trained on cleaning and the preventative maintenance procedure. Catching defects or seeing indicators early will minimize scrap and perhaps tooling damage and thereby minimize tooling costs.
Properly maintained applicators will not only save unwanted downtime and headaches, but they will also ensure better crimp quality.
Looking for a reprint of this article?
From high-res PDFs to custom plaques, order your copy today!


