Parts Marking: When All You Need Is a Dot
Marking parts with colored inks or stains is a fast, easy way to differentiate between similar-looking components, indicate pass-fail status or confirm that a specific process has been performed.

Manufacturers mark parts for many reasons: to differentiate between similar-looking parts; to indicate that a process has been performed or a quality check has been passed; to facilitate assembly; or to link a product or component to the assembly line or machine on which it was produced. Parts like calibration screws may even be marked with stains that only become visible under ultraviolet light to indicate whether they have been tampered with.
One of the most common uses of color marking is to make it easier to tell the difference between parts that look similar. Although such parts may be marked with numbers, letters or some other identifier, some companies choose to color-code them as well, to speed and simplify identification on the shop floor. For example, two springs may appear identical, but may function very differently. Marking each one with a different color stripe is a simple way to tell them apart.
Another major use for parts marking systems is in quality control. Parts are often marked after a test has been performed to indicate whether they have passed or failed. Parts are also marked to indicate that a particular process has been completed. This is especially useful if that process does not visibly change the parts.
Marking systems are often integrated into testing or production fixtures. An example is a flywheel that gets mounted on an engine with multiple bolts, which are then simultaneously tightened. When all of the bolts have been torqued to specification, the marking device moves into position and applies a dot to confirm that the operation was performed correctly. If the dot is not there, operators downstream will immediately know that additional inspection or corrective action is required.
Parts are also frequently marked with color to facilitate assembly processes. For example, assemblers may put a dot of stain on brake calipers to confirm that pads have been installed before mounting rims and tires. Or, a shaft could be marked to indicate which end to insert.
Marking is also used in automotive and other stamping processes to check the contours of stamped parts during setup to indicate whether a bend has the correct radius or a crease is straight. In applications like this, color marking provides an easy way to point out any discrepancies so the operator can fine-tune the press setup.
The simplest of all marking “systems” are handheld valve-actuated markers, which are often used in processes such as filling an automatic transmission with fluid and then marking the dipstick for visual confirmation.
Contact marking systems consist of an ink or stain reservoir fitted with a pad or dauber and mounted on an air cylinder or similar device. As the part moves into position or the test or process is completed, the actuator advances to press the saturated dauber against the part. Depending on the marking fluid, the parts may need to be clean and dry to achieve an acceptable mark.
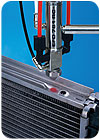
Noncontact marking systems typically use a pneumatic spray valve to apply spots, stripes and bands, with stain supplied from a tank or disposable reservoir. Depending on the application, the valve can be mounted in a fixed location or attached to an actuator that moves it to the part. In some processes, the part is rotated while the valve applies a band of color around the outer circumference.
Transparent staining colors have a thinner viscosity than opaque stains and dry slightly faster. They are typically used on lighter colored substrates or in marking applications involving tight tolerances, such as engine rods. Transparent stains will not settle or separate.
Opaque stains use more pigment to produce a heavier mark, and perform well on both light and dark substrates. These stains apply slightly thicker than transparent stains and take slightly longer to dry. Thickness can be adjusted by adding thinner.
Because they contain more pigment, opaque stains will settle over time, and daubers will need to be periodically agitated to work properly. Opaque stains also increase the likelihood of spray nozzles clogging and requiring maintenance.
Nozzle clogging is a common problem with spray valves, particularly when using heavily pigmented, opaque paints and stains. To avoid applying a thick, heavy spray mark that is slow to dry, valve stroke is usually shortened to “choke down” the aperture to reduce coating thickness. This causes the pigment to be filtered out of suspension at the valve nozzle, causing it to clog.
Clogging can be minimized by using a low-volume, low-pressure (LVLP) spray system to apply the stain. Because LVLP designs work with lower pressures and flow rates than standard spray systems, a longer valve stroke can be used. This leaves more space around the valve needle, which reduces the possibility of pigment building up to the point where it eventually blocks the valve nozzle.
Separation is another issue with many pigmented stains. This occurs when the pigment separates from the carrier and settles to the bottom of the reservoir, resulting in fainter, less consistent marks that may not be picked up by visual scanning systems.
Both issues-clogging and separation-can be prevented with an LVLP spray marking system with a double-ported fluid head and a recirculating pump that keeps the marking fluid moving so the pigment remains in suspension.
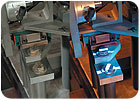
EFD’s new 781RC recirculating spray marking system is an example of this type of equipment. A motor-driven gear pump pulls fluid from the reservoir and supplies it to the spray valve, where it enters one side of the fluid head and exits the other. As fluid is returned to the reservoir, it produces a slight agitation that keeps the pigment from settling at the bottom of the tank. Because as little as 1 psi is sufficient pressure to keep the marking fluid constantly recirculating, a long valve stroke can be used to maintain open space around the valve needle, while a programmable air delay after each shot keeps the nozzle clean and further reduces the risk of clogging.
* marking speed.
* the cost of the marking fluid and need to maintain inventory (individual stain bottles and applicators vs. less expensive bulk bottles).
* the need to regularly monitor the system to ensure ink is in the bottle vs. using a tank that can be filled once at the start of a shift.
* time needed to change ink bottles or refill a tank and whether the line must be shut down to do this.
* time and cost of replacing contaminated or dried out pads and daubers.
Once maintenance requirements, downtime, fluid costs and line speeds have been considered, a noncontact spray marking system often proves to be a more economical long-term choice.
Manufacturers mark parts for many reasons: to differentiate between similar-looking parts; to indicate that a process has been performed or a quality check has been passed; to facilitate assembly; or to link a product or component to the assembly line or machine on which it was produced. Parts like calibration screws may even be marked with stains that only become visible under ultraviolet light to indicate whether they have been tampered with.
One of the most common uses of color marking is to make it easier to tell the difference between parts that look similar. Although such parts may be marked with numbers, letters or some other identifier, some companies choose to color-code them as well, to speed and simplify identification on the shop floor. For example, two springs may appear identical, but may function very differently. Marking each one with a different color stripe is a simple way to tell them apart.
Another major use for parts marking systems is in quality control. Parts are often marked after a test has been performed to indicate whether they have passed or failed. Parts are also marked to indicate that a particular process has been completed. This is especially useful if that process does not visibly change the parts.
Marking systems are often integrated into testing or production fixtures. An example is a flywheel that gets mounted on an engine with multiple bolts, which are then simultaneously tightened. When all of the bolts have been torqued to specification, the marking device moves into position and applies a dot to confirm that the operation was performed correctly. If the dot is not there, operators downstream will immediately know that additional inspection or corrective action is required.
Parts are also frequently marked with color to facilitate assembly processes. For example, assemblers may put a dot of stain on brake calipers to confirm that pads have been installed before mounting rims and tires. Or, a shaft could be marked to indicate which end to insert.
Marking is also used in automotive and other stamping processes to check the contours of stamped parts during setup to indicate whether a bend has the correct radius or a crease is straight. In applications like this, color marking provides an easy way to point out any discrepancies so the operator can fine-tune the press setup.
This spray valve has a dual-ported fluid head. A programmable air delay after each shot keeps the nozzle clean and reduces clogging and maintenance. Photo courtesy EFD Inc.
Three Marking Methods
Common part marking methods include handheld valve-actuated markers, contact marking systems that press a stain-saturated pad against the part, and noncontact spray marking systems.The simplest of all marking “systems” are handheld valve-actuated markers, which are often used in processes such as filling an automatic transmission with fluid and then marking the dipstick for visual confirmation.
Contact marking systems consist of an ink or stain reservoir fitted with a pad or dauber and mounted on an air cylinder or similar device. As the part moves into position or the test or process is completed, the actuator advances to press the saturated dauber against the part. Depending on the marking fluid, the parts may need to be clean and dry to achieve an acceptable mark.
Noncontact marking systems typically use a pneumatic spray valve to apply spots, stripes and bands, with stain supplied from a tank or disposable reservoir. Depending on the application, the valve can be mounted in a fixed location or attached to an actuator that moves it to the part. In some processes, the part is rotated while the valve applies a band of color around the outer circumference.
Parts such as calibration screws can be marked with stains that only become visible under ultraviolet light to indicate whether they have been tampered with. Photo courtesy ITW DYKEM
Pigment and Maintenance
Marking fluids are commonly referred to as inks, staining colors or paints, and generally fall into one of two classifications: transparent or opaque.Transparent staining colors have a thinner viscosity than opaque stains and dry slightly faster. They are typically used on lighter colored substrates or in marking applications involving tight tolerances, such as engine rods. Transparent stains will not settle or separate.
Opaque stains use more pigment to produce a heavier mark, and perform well on both light and dark substrates. These stains apply slightly thicker than transparent stains and take slightly longer to dry. Thickness can be adjusted by adding thinner.
Because they contain more pigment, opaque stains will settle over time, and daubers will need to be periodically agitated to work properly. Opaque stains also increase the likelihood of spray nozzles clogging and requiring maintenance.
Nozzle clogging is a common problem with spray valves, particularly when using heavily pigmented, opaque paints and stains. To avoid applying a thick, heavy spray mark that is slow to dry, valve stroke is usually shortened to “choke down” the aperture to reduce coating thickness. This causes the pigment to be filtered out of suspension at the valve nozzle, causing it to clog.
Clogging can be minimized by using a low-volume, low-pressure (LVLP) spray system to apply the stain. Because LVLP designs work with lower pressures and flow rates than standard spray systems, a longer valve stroke can be used. This leaves more space around the valve needle, which reduces the possibility of pigment building up to the point where it eventually blocks the valve nozzle.
Separation is another issue with many pigmented stains. This occurs when the pigment separates from the carrier and settles to the bottom of the reservoir, resulting in fainter, less consistent marks that may not be picked up by visual scanning systems.
Both issues-clogging and separation-can be prevented with an LVLP spray marking system with a double-ported fluid head and a recirculating pump that keeps the marking fluid moving so the pigment remains in suspension.
EFD’s new 781RC recirculating spray marking system is an example of this type of equipment. A motor-driven gear pump pulls fluid from the reservoir and supplies it to the spray valve, where it enters one side of the fluid head and exits the other. As fluid is returned to the reservoir, it produces a slight agitation that keeps the pigment from settling at the bottom of the tank. Because as little as 1 psi is sufficient pressure to keep the marking fluid constantly recirculating, a long valve stroke can be used to maintain open space around the valve needle, while a programmable air delay after each shot keeps the nozzle clean and further reduces the risk of clogging.
Choosing a Marking System
When comparing contact and noncontact marking systems, engineers should consider these factors:* marking speed.
* the cost of the marking fluid and need to maintain inventory (individual stain bottles and applicators vs. less expensive bulk bottles).
* the need to regularly monitor the system to ensure ink is in the bottle vs. using a tank that can be filled once at the start of a shift.
* time needed to change ink bottles or refill a tank and whether the line must be shut down to do this.
* time and cost of replacing contaminated or dried out pads and daubers.
Once maintenance requirements, downtime, fluid costs and line speeds have been considered, a noncontact spray marking system often proves to be a more economical long-term choice.
Looking for a reprint of this article?
From high-res PDFs to custom plaques, order your copy today!


