A quality crimp meets or exceeds performance specifications related to crimp force, height and width; pull-out force; strip length; and insulation window (area between the wire and insulation). Terminal manufacturers supply these specifications, but they are general in nature.
As a result, many manufacturers have developed their own industry- and application-specific specifications. Some manufacturers prefer to follow terminal standards like UL 486A-486B, which is used in North America. Other popular standards include IPC/WHMA-A-620 for wire harness manufacturers and SAE AS7928 for the military and automakers. The VW 60330 standard by Volkswagen Co. tells their suppliers how they should test crimped terminals.
Depending on the specification or standard, one or more of the following tests will be required: crimp force monitoring, wire pull-out and micrograph inspection. Performing these tests can be expensive, and harness assemblers should remember to factor these costs into the total cost of each product.
Crimp Force Monitoring
Performed during the crimping process, this test immediately determines whether or not a crimp is good based on predetermined force and height parameters. A crimp force monitoring system (CFMS) consists of a load cell to measure crimp force, a triggering device that initiates reading of force measurement, and a control unit to analyze the data. The system is used with automated crimping machines and comes standard on several models.
System setup begins by entering crimp height into the control unit. Crimp height is determined manually with a micrometer, which has a thin blade that supports the crimp top and a pointed section that determines the crimp bottom. This measurement is taken in the center of the crimp.
Once crimp height is determined, software in the control unit automatically calculates required crimp force and converts it into a curve over time that represents a good crimp.
The triggering device is then programmed so it tells the control unit when to start and stop analyzing the force data provided by the load cell. Types of triggering devices include proximity switches, light barriers mounted on the press body, and encoders connected to the ram.
The load cell is located on the press frame or in the ram or base plate. If the application requires greater sensitivity, a ring sensor can be used and should be placed in a direct line with the pressing force.
With programming complete, the operator now teaches the system to use the good crimp curve as a reference force. Each subsequent crimp is compared with this force. A bad crimp is one that deviates from the reference force.
Changes in crimp height, even slight ones, can cause deviations in crimp force. Depending on the wire, crimp height tolerance may be as small as 0.002 inch. Crimp height that is either too short or too long can prevent maximum crimp strength and reduce wire pull-out force. Also, a too-short crimp height may indicate cut wire strands or a damaged terminal.
Terminals must be properly sized, otherwise wire strands can end up in different areas of the crimped terminal and cause large variations in crimp force. Also, terminals should not have gold
contacts or plastic insulation. Both of these materials are soft and allow too much variation.
To ensure a good crimp, CFMS parameters need to be reset whenever a different terminal or wire needs to be crimped. Also, wires need to be inserted to a consistent depth. This can be a challenge for new operators or workers who use older crimping machines.
Another challenge is limiting the negative impact of bad crimps on production. Erich Moeri, manager of applications engineering for the Komax Group, says all Komax crimping machines are equipped with a CFMS that categorizes bad crimps as being either out-of tolerance or a gross fault.
“Terminals with out-of-tolerance crimps get chopped in two, the pieces are dropped into a scrap pile and production continues,” says Moeri. “A gross error means a crimp takes place but there is either no terminal or wire. This error immediately stops production.”
Wire-Pull Testing
A wire-pull tester is a manual or electric device that applies horizontal or vertical force to a crimped terminal to determine its pull-off force. Manual models use a lever or hand wheel to apply force. The lever is quicker and easier to use, but the hand wheel offers better control of the speed at which force is applied.
Electric models feature a brushless motor that applies force smoothly regardless of speed. All wire-pull testers feature a multi-terminal grip with up to 12 apertures, each of which can hold a different gauge wire.
The operator places the crimp into the correct slot, secures the open wire end into place, and clears the display. He initiates the test by pushing down the lever, turning the hand wheel or pressing the start button. Pull-off force is determined when the wire (usually 4 to 8 inches long) either breaks or comes out of the terminal.
The manual WT3-200 from Mark-10 Corp. produces up to 1,000 newtons of horizontal force and handles wire from 30 to 3 AWG. Pull-out force is displayed in ounces, pounds, kilograms or newtons, says Mark Fridman, sales and marketing manager for Mark-10 Corp. The WT3-200 can store 1,000 readings and transfer this data to a PC or PLC via USB, RS232, Mitutoyo or analog outputs.
Imada Inc. makes an electric vertical wire tester that can produce up to 500 newtons of force. Stand-mounted, the device features a digital display and has a speed range of 0.4 to 11.5 inches per minute.
Several optional attachments are available to hold the open wire end, says Aki Morita, president of Imada. These include clamp or serrated jaws, a spring-loaded or quick-action cam grip, and a screw-tightened vise.
The pull-off test is always destructive. However, the tester can be used in nondestructive ways.
“Some requirements call for maintaining a specific tensile load for a specified
period of time, say 50 pounds for a minute,” says Fridman. “This test yields information about the performance and durability of the cable assembly.”
It is not uncommon for manufacturers who crimp small wire—such as those in the aerospace and automotive industries—to pull-test several terminals before a production run and then do random tests during a run to assure crimp quality. In general, manufacturers who crimp larger wire tend to pull-test less.
Micrograph Inspection
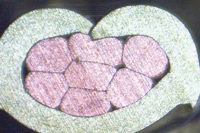
A micrograph is a photo of a crimped terminal cross-section taken by a microscope. A micrograph inspection involves analyzing this photo to measure crimp height and width; determine whether or not the crimp is gas tight (no voids within the strands); and if and why there is terminal deformation.
Micrograph inspection is quite expensive. A system can cost from $10,000 to more than $40,000. As a result, the test tends to be used on high-volume parts or safety products like automobile air bags or wire harnesses used in aerospace applications that have many hand-crimped terminals.
Workers that perform micrograph inspection receive some training, although the test is becoming easier to complete, says Wyatt George, vice president—North America for Schaefer Technologies LLC. Micrograph system components include a cutting and polishing module, an etching module, a microscope and software for image capture and evaluation.
To create a cross-section, the worker locks the terminal into position within the cutting and polishing module. After a small rotary saw cuts through the crimped terminal, one or two grinding wheels polish the exposed section of the terminal and wire.
The worker then acid etches these inner surfaces to remove impurities and improve their visibility. Depending on the system, the terminal and wire may be either dipped into an acid bath or etched with a special etching pen. This latter method is environmentally safer and helps create a good visual separation of the terminal and individual wire strands.
On average, it takes from 3 to 5 minutes to create the cross-section, which is then viewed with a standard laboratory microscope. Software used with the microscope enables the worker to take a high-quality photo of the cross-section and to perform various measurements.
Schaefer Technologies makes the SQS-02 micrograph lab, which features a special retainer that ensures proper alignment of the terminal to the grinding discs. The compact SQS-02 also features vertical measuring optics and an integrated neon light system.
George says the SQS-02 uses dhs Image Data Base software and the pixel-fox digital imaging system to acquire, measure and store cross-section images. It also converts the images from shapes into pixels so they can be output on a video display or printer, or stored in a bitmap format.
The SL SBL Micro 3 system from Komax uses Vision III software, which measures according to international norms required by the auto industry. Moeri says TopWin software allows the system to be integrated with pull testers and micrometers to obtain pull force and crimp height measurements.
he process of crimping a terminal to the end of a wire happens in an instant. These three tests can help manufacturers achieve excellent results every time.


