advertisement
How To Conduct a Risk Assessment

Risk assessments are live documents that follow machinery from its infancy until it is put out of commission. They help owners understand and maintain suitable, safe environments for their employees. So, it is important that risk assessments are not only thorough, but easy to create and follow. The process of designing and maintaining safety systems for automated equipment may seem daunting, but it can be broken down into 5 simple steps.
- Identifying Hazards
- Assessing Initial Risk
- Risk Reduction
- Assessing Residual Risk
- Validating Solutions
Step 1: Identifying Hazards.
The best risk assessments start out as lists made by machine designers before the machine is released for fabrication. A small team of knowledgeable personnel should step through the process steps to identify all the hazards that exist on a machine before safe guarding is implemented. Those designers are not just considering operators, they are considering everyone who could reasonably be harmed from the hazard. For example, a UV cure light will harm the operator standing at the machine, but have the technicians who are walking by the machine to lunch been considered? How about the maintenance personnel working on the valve manifold or in the electrical cabinet? It is important to consider all parties when conducting a risk assessment.
Step 2: Assessing Initial Risk
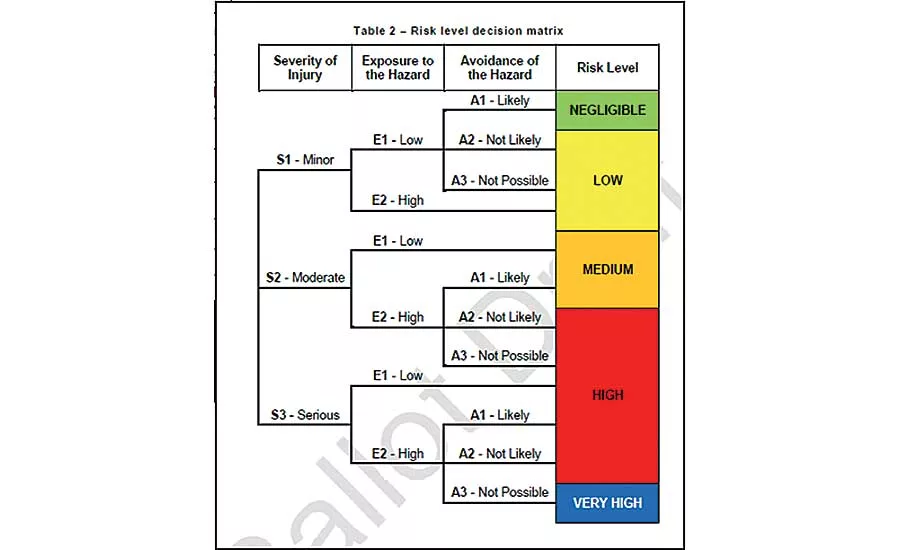
In order to understand the magnitude of risk for each hazard on the machine, the risk must be quantified. There are three qualities to quantify: Severity of Injury, Frequency of Exposure, and Probability of Avoidance. The 3-2-3 convention (Figure 1) may be used to calculate a risk value that represents the level of risk to personnel before safe guards are considered. This method is recognized in RIA TR R15.306 Table 2 as an accepted way to quantify risk.
Step 3: Risk Reduction
After all machine hazards have been appropriately identified and quantified, risk reduction measures should be taken. Not all risk reduction measures are made equal, however. The hierarchy of hazard mitigation, also called the hierarchy of controls, organizes mitigation principles by effectiveness. This cornerstone of risk reduction is seen in some capacity in both ISO 12100 and ANSI B11.0 standards.
Looking for quick answers on assembly and manufacturing topics? Try Ask ASM, our new smart AI search tool. Ask ASM
Consider a pinch point that exists between a moving palate and weldment in the initial design. If the designer systematically moves through his design and catches the pinch point before the machine is released, he may choose to move the weldment backseveral inches, eliminating the hazard all together. Consider a second example: If laser marking is an operation of the machine, the operator may be given a hood that protects him from harm, but what is in place to ensure he is wearing it? What about bystanders? Instead, it is safer for the PLC to not allow the laser to begin marking until the safety doors have been shut (interlock switches have been met).
Step 4: Assessing residual risk
When all hazards have been recorded and most effective risk reduction measures planned, they should all be rated again to identify residual risk. All machines after safety controls have an element of “residual risk”. It is up to the risk assessors to determine if that residual risk is acceptable or not.
Step 5: Validate Solutions
After safety measures are in place, they must be proven effective. Recording proof, or validating, safety controls is the final step to completing a risk assessment. For example, the documentation of stop time measurements, ensuring light curtains are installed at the appropriate distance away from the closest hazard, is validation. Maintaining certifications of light tight boxes is validation. It is not enough to implement safety controls: safety controls must be implemented correctly.
If completed with thought and genuine effort, Risk Assessments are an essential tool that help designers and end-users create and maintain safe machinery.
Looking for a reprint of this article?
From high-res PDFs to custom plaques, order your copy today!


