New technology is often misunderstood. Manufacturers know this fact all too well.
Consider, for example, their excitement nearly 15 years ago when suppliers of LEDs promised that this light source could cure UV adhesives more cost effectively than traditional bulbs (mercury arc, metal-halide, electrodeless). Manufacturers were also told that LEDs last longer, generate less heat and can be used in more flexible configurations than bulbs.
This extensive list of benefits convinced many companies to replace their bulbs with LEDs. But there was an unforeseen problem.
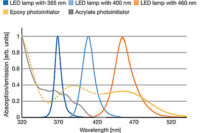
“An LED produces light in a narrow wavelength, about 15 nanometers wide, whereas traditional bulbs produce light in a much-wider wavelength range, from below 250 to 1,000 nanometers,” explains Mike Kay, director of product management for Lumen Dynamics Inc. “The problem was, manufacturers didn’t realize the LED’s narrow wavelength sometimes didn’t match the trigger of the adhesive’s photoinitiator. As a result, the UV adhesive failed to properly cure.”
Today, wavelength mismatching rarely happens because manufacturers can now buy UV adhesives formulated specifically for use with LEDs. This advancement in adhesive chemistry helps manufacturers obtain all of the promised benefits of LEDs.
Equally important is using the right curing system. Manufacturers can choose from a wide range of spot, flood, chamber and conveyor systems to find the one best suited for their UV-adhesive application—whether it’s bonding two parts made of the same material, potting an electronic assembly or curing in-place gaskets.
Spot On
The most common method used to cure UV adhesives is spot curing. These systems usually feature a controller with attached tubes (called light guides or wands). After the assembler sets light irradiance (watts per cubic centimeter) and duration (seconds) on the controller, the light is turned on. Low- or high-intensity light passes through the tube, which has a lens at the tip, at a diameter of 5 to 12 millimeters.
To cure adhesive manually, the assembler places the wand tip close to the treated area and holds it for a second or two. For automated applications, extended-length wands are mounted just above the conveyor to ensure precise placement of the narrow light on the treated area.
“Because this method provides rapid curing of small parts, it is popular in all industries,” says Rich Golebiewski, director of sales and marketing for Tangent Industries Inc. “Medical device manufacturers frequently use it for needle bonding and syringe-needle assembly.”
The wand is very flexible, enabling assemblers to quickly and accurately position, remove and reposition the light. Spot curing is also great for gasket forming because it allows the assembler to move the wand in any direction around a part or adhesive bead.
However, spot curing large areas is much less cost-effective than using a flood, chamber or conveyor system. Another limitation is each part needs to be held securely or fixtured prior to light being applied.
Henkel offers a series of portable LED devices that do not require a controller. The units run on rechargeable batteries or AC power, can be hand operated or fixtured, and feature an internal cooling fan. They deliver light irradiance of 2.5 to 3 watts per cubic centimeter at a wavelength from 390 to 420 nanometers.
The Flood
Flood curing is recommended when curing large parts, many parts or many types of parts simultaneously. System components include a controller (to set irradiance and duration), a light box or LED array, a stand, and a cable to connect the controller and light.
The light box, which limits the assembler’s exposure to UV rays, is mounted on the stand. For manual applications, parts are placed below the light box, and the controller is turned on by hand or activated by a foot switch. Light projects downward and, within a few seconds, cures parts positioned in an area of 4, 5 or 8 inches square. For automated applications, the controller is integrated into the production line, and parts are conveyed under a mounted light box.
Flood curing is frequently used to coat or seal PCBs or pot electronic assemblies. Medical device manufacturers find the method very effective when curing catheters and cylindrical parts. It also is used to cure form-in-place gaskets on larger parts.
“Flood lights emit more heat than light guides, so you must make sure each part is underneath the light for the proper duration,” says Kay. “If left too long under the light, plastic and electronic components can melt.”
Another drawback of flood curing, according to Andy Scott, medical market application engineer for Henkel Corp., is it produces lots of stray lighting. Although invisible, UV light can be harmful to skin, so manufacturers need to insure worker safety around affected areas.
Some suppliers offer focused-beam flood curing systems, which use reflectors to deliver a high-intensity beam of light to achieve maximum cure depth. The beam measures either 1 by 4 or 1 by 6 inches and has an irradiance of up to 350 watts per cubic centimeter. Typical cure times range from 10 to 30 seconds.
The BlueWave LED DX-1000 from Dymax Corp. can be configured to operate as either a small-area flood or spot-cure system. In flood mode, the system delivers up to 1 watt per cubic centimeter over a 1-by-1.5-inch area. In spot mode, one or several light guides can be installed into an optional adapter to cure tiny areas with up to 15 watts per cubic centimeter. The company also recently introduced a high-intensity LED flood with a 5-by-5-inch active area.
“This past winter, a customer tested the LED flood in their application to bond metal and glass components for a very-high-volume part—producing close to 1 million units per week,” notes Dennis Dell’Accio, product manager for equipment at Dymax. “It is set up to automatically cure adhesive through the glass side. Initial curing cycle time was 5 seconds per part, but we got it down to about 0.5 second.”
Quick Cure Oven
“A chamber curing system looks and works very similar to a toaster oven,” notes Scott. “The assembler places parts on a tray and slides it into the chamber. When he presses the start button, the light-box shutter automatically closes, and the top light turns on to initiate curing.”
Small chambers feature a single light and a 6-inch-square tray, whereas large units feature several lights and a tray up to 18 inches square. Cure time ranges from 1 second to several minutes, depending on adhesive and part size or volume. The chamber is controlled by a built-in timer and can be operated in a continuous or timed mode.
Manufacturers in all industries like the chamber’s versatility. It can be setup for activation by footswitch, panel-mount start button or PLC interface. Plus, it features slots that let assemblers adjust tray height to optimize part exposure.
End-users also like the chamber’s safety features. Automatic shutter control protects operators from UV exposure during tray loading and unloading. A safety switch keeps the shutter closed during curing.
The LED Cube 100 from Honle AG is a compact UV irradiation chamber designed for bonding or potting components used in the electronics, optical or medical industries. It is available in wavelengths of 365, 385, 395 and 405 nanometers, and has a maximum irradiation intensity of up to 1 watt per cubic centimeter.
Move Along
Because they require a fair amount of energy and floor space, conveyor curing systems are best suited for moderate to high-volume applications. A typical system’s conveyor is about 12 inches wide, several feet long and mounted on a platform.
Centered over the conveyor is a curing section topped with a light box. The number of bulbs or LEDs used in the light box always depends on the adhesive’s exposure requirement, says Dell’Accio.
The operator sets light intensity, duration and belt speed before starting the conveyor. Bulbs stay on continuously during operation, but LEDs are triggered on when a part is in position for curing.
If belt speed is slow enough, one worker can load parts at the front of the conveyor and retrieve parts at the back. In high-production applications, different workers perform these tasks.
The curing section of the OmniCure CV300 conveyor system features a center opening, into which is placed the OmniCure AC7150 or AC7300 LED light array. Depending on application, the array is either positioned perpendicular to the belt’s direction of travel, or in 15-degree steps until it is parallel to the belt.
The system features an effective curing area of up to 1 foot wide. Travel speed of the Teflon-coated fiberglass belt can be set from 3 to 48 fpm in 1-foot increments. An interlock connection turns off the LED when the belt stops.
Cured of Poor Performance
UV-adhesive-curing systems present manufacturers with two ongoing challenges: optimize system performance and maintain it. Meeting both challenges requires consistent monitoring of several factors.
Dell’Accio says step one is determining the lowest acceptable intensity (LAI) of light needed to fully cure the adhesive in the available cure time. LAI is always application specific and involves curing parts at various intensities and testing them to customer performance requirements. Once LAI is determined, he suggests building in some additional margin by increasing either the cure time or intensity by 50 percent.
Light intensity should be checked at the same time every day with a UV meter or radiometer, recommends Scott. If the bulb or LED is below the required irradiance, change it immediately.
Monitoring intensity is especially necessary for systems with bulbs, which degrade slowly over time. An LED might degrade, but it usually just dies at the end of its lifespan.
“It’s a good practice to measure light intensity at the bond line where the adhesive is dispensed using a UV meter or a radiometer,” suggests Golebiewski. “Equally important is making sure the same amount of adhesive is always dispensed to each part.”
Several medical device manufacturers closely monitor their curing operations with the AssureCure system from Henkel. It quantifies and confirms cure level of acrylic-based UV adhesives. Introduced in 2012, the system includes adhesives, an LED light source, a detection unit and software.
An operator places the LED light at one to four points along the adhesive bond line, and the detection unit optically measures the adhesive’s response during polymerization. System software analyzes this data and outputs to a PC or PLC either a go/no-go signal or a numerical value indicating the level of cure achieved.
Not every part cures best with circular lighting. Sometimes a line- or ring-shaped light is more effective, observes Kay. For those applications, specialty and custom optics are required to precisely apply light to the part.
Finally, manufacturers need to verify the presence and proper location of an adhesive on each part, and must make sure the adhesive is neither underexposed nor overexposed to UV light. Fluorescent detection is an effective way to verify adhesive presence and location.
Automated detection units feature an LED or other light source that illuminates the additive. If an adhesive is not detected, the system notifies the operator via a workstation PC or PLC. Manual detection involves shining a black light on the part, causing a blue or red area to appear in the part and verify adhesive is present.
The effect of underexposure is incomplete cure. Dell’Accio says double or even triple exposure (two to three times the dosage required to cure) usually produces no adverse effect on adhesives, including those from Dymax. However, exposure beyond this level will degrade any UV adhesive and some substrates, especially plastics.
Signs of degradation include adhesive cracking, or a change in color or some physical property, such as increased hardness or decreased elongation. Adhesive degradation may also be caused by excessive heat absorption. A cooling fan in the curing area minimizes the effect of this problem.
ASSEMBLY ONLINE
For more information on UV-adhesive curing, visit www.assemblymag.com to read these articles:


