Marking Metal Parts With Precision
Manufacturers have several options for precisely marking metal parts.
Manufacturers often need to mark different types of metal parts. Some of these parts may require several complex codes, while others need just a few simple numbers. In every case, though, the markings need to be permanent, regardless of part size.
Ferris wheels and mining machinery feature several large steel parts, and some of them—like the drive-chain—need to be permanently marked for identification and traceability. Tsubakimoto Chain Co. makes drive-chains for a wide variety of applications, including Ferris wheels and mining machinery.
In 2015, Tsubakimoto began using a custom conveyor with dual-integrated, dot-peen marking machines from Kwik Mark Inc. to mark serial numbers on the links in each drive-chain to better track production data.
Emil Cindric, president of Kwik Mark, says that each link measures up to 24 inches long by 20 inches wide and up to 2 inches thick. The marking machines sit next to each other at the center-top of the conveyor and are adjustable along the conveyor length. They quickly imprint serial numbers, date codes and other information on the links. Cindric says the automated, 2-ton conveyor has enabled Tsubakimoto to double its part-marking production.
Aerospace engines also feature metal parts that require precise and high-contrast markings. A precision aerospace company uses a custom scribe-marking system from Columbia Marking Tools (CMT) to mark a wide range of aerospace engine parts.
The system produces high-contrast markings and is integrated into a high-volume production line, according to Michelle Krembel, president of CMT. After the part is marked at the marking station, a vision system ensures that all markings meet specification. The part is then moved to the next station for further assembly work.
Dot-peening and scribing are two of several methods available to manufacturers for marking metal parts. Manual stamping, impact machines, chemical etching, ink-jet printing and lasers also produce quality markings on steel, stainless steel, aluminum, titanium, brass and copper.
Looking for quick answers on assembly and manufacturing topics? Try Ask ASM, our new smart AI search tool. Ask ASM
The type of metal being marked often dictates which method is best. Equally important factors include the application requirements, environmental factors (such as moisture or chemical exposure), budget and production demands.
Stamp of Approval
The weekly Dragnet television show of the 1960s did more than just entertain its viewers. It also gave them a quick demonstration of manual metal stamping after each episode. The demo involved a man using a hammer to strike a stamp twice against a sheet of metal. After the man removed the stamp, an indented Roman numeral VII was revealed to be part of the logo of the show’s producer, Mark VII Limited.
“Hand stamping metal parts remains a cost-effective and permanent marking method, but it is labor intensive,” notes Krembel. “Nonetheless, it is often used by quality control people to mark parts that have passed final inspection. In fact, some automotive manufacturers still hand stamp their logos on engines and other proprietary parts.”
The hand stamp is just a rectangular piece of metal with one or more characters engraved on one end. It can be directly struck with a hammer, placed in a hand holder to ensure even indentation, or mounted in a press. Metal stamps come in all shapes and sizes and are easily customizable with nearly any text, logo, or symbol. Complex dies can even automatically advance digits to create consecutive serial numbers.
Small hand stamps are often used to mark stainless steel knives, notes Matt Martin, director of sales and marketing at Durable Technologies. Larger stamps are used to mark consumer products like outdoor grills.
Several years ago, Geo. T. Schmidt Inc. created separate custom embossing stamps for Sunbeam Products’ GrillMaster and Coleman production lines. The two-part stamps reconfigured the lettering of the words off, high and low; and produced a lightning bolt graphic and company logo. The exact-fit stamps were inserted into existing sheet metal dies that cut the burner bases.
Roll marking, a variation of hand stamping, involves rolling a round die over a flat metal part, or rolling a round part past a flat die. Pressure applied by the marking machine to the die face leaves a permanent impression on the metal surface. Martin says that this method is recommended for applications where the marking surface is delicate or might be damaged by the pressure applied with a typical impact marking press.
A train-bearing manufacturer recently installed Columbia’s all-electric Model 960 servo-driven roll marking machine to imprint part and serial numbers, a date code and the phrase “Made in the USA” on its wheel bearings. The machine uses the D2D, or diameter-to-diameter, method to produce even marking pressure on round diameter parts. This ensures high-quality marks on all parts, including those with flanges that vary by up to 0.25 inch, curvatures that exceed 10 percent and inconsistently shaped couplings. The standard line of machines can be equipped with part fixturing, automation or manual operation, light curtain or dual safety palm buttons, and complete turnkey controls.
Air impact markers use mass and air pressure to quickly hammer a small die into metal. According to Krembel, these markers have a cycle time of less than 1 second, cost much less than dot-peen and laser systems, offer high repeatability and are versatile enough to integrate into full assembly lines or turnkey workstations. Air-over-oil and hydraulic impact markers are also available, although the latter can cost as much as $10,000, compared to about $3,000 for an air-powered unit.
The Slide-A-Mark 751 series of air impact markers from CMT offer telescoping action with part preloading. They can mark up to 20 0.125-inch characters in 0.5 second. The units are often used for marking part numbers, serial numbers and date codes.
These units are also able to mark on the facing or reverse side of the part. Other similar units are available to operate when submerged in water. Stroke length is up to 10 inches. The connecting PLC receives a DC signal when the marking process is complete.
A More Styl(us)ized Approach
Engraving is another popular method of marking metal parts. This approach encompasses dot-peening and scribe marking.
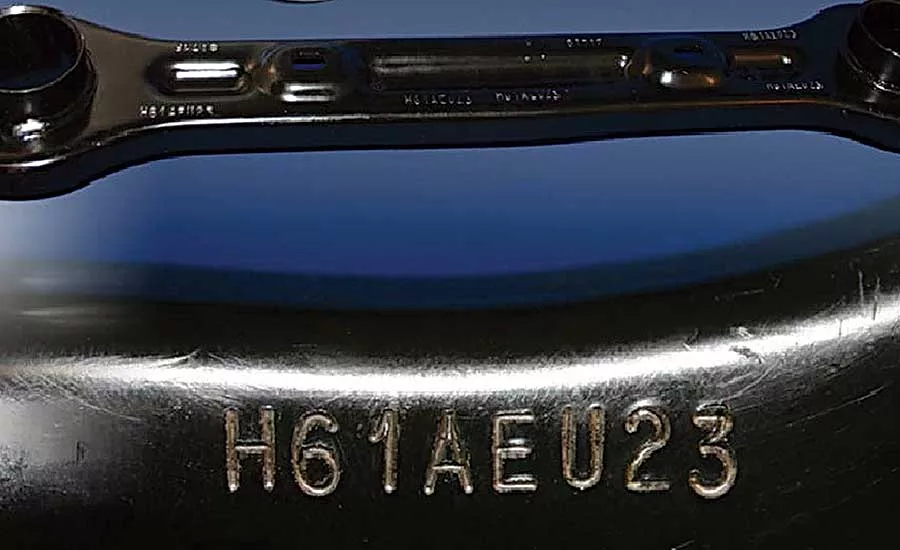
In dot-peening, a hardened-carbide or diamond-tipped stylus lightly but rapidly impacts the part and leaves a series of individual dots that are spaced tightly enough together to appear as a solid line. Manufacturers like the method, because it quickly produces error-free bar codes, logos, alphanumeric characters and 2D matrix codes of various sizes and depths.
“One of dot-peening’s main advantages is that it engraves metal without removing it or creating chips,” notes Cindric. “The stylus moves so fast, up to 200 times per second, that it produces a controlled-depth microimpact on the metal with no loss of strength.”
Because the stylus’ long stroke is very forgiving of part thicknes and surface variations, it ends up ‘floating’ on the surface being marked, according to Cindric. This capability allows round parts to be marked as if they were flat.
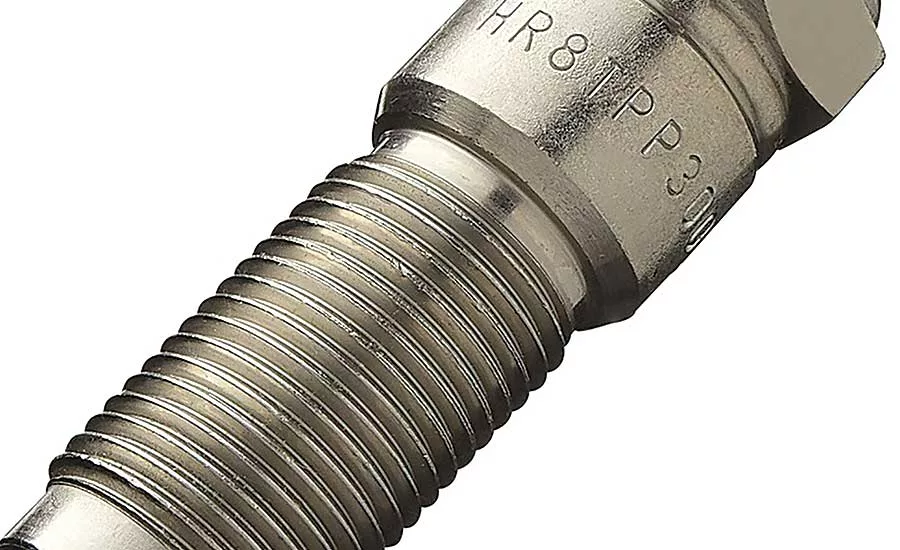
Cindric says that his customers use dot-peening on most metals, including aluminum, brass, steel and stainless steel. The process uses no cutting tools that heat up and wear, making it ideal for marking materials with a hardness of HRC 60 to 62. Dot-peening can also mark through most surface coatings or films, and is well-suited for use with conveyors, rotary dials and robots on automated production lines.
On the downside, dot-peened 2D matrix codes are sometimes low contrast. This can result in reading problems down the line, unless good contrast can be created in the images with correct illumination.
Last year, Kwik Mark introduced its streamlined X Series dot-peen marker with six axes of motion control and a retractable cantilevered marking head. The marker is ideal for marking operations of any volume, and its head provides a clear sight line by retracting and passing over tooling and equipment. Key construction components include twin rigid upright column leadscrews, ball slides, brushless servomotors, noncontact home sensors and a large T-slot table for fixturing. The marker comes with a programmable Z axis (to full column height) and requires neither a PC nor a control box to work.
Also available from Kwik Mark is the Micro Mark dot-peen machine. It can be trigger-activated in handheld applications or button-activated when integrated into assembly lines. The unit has a small footprint (3 by 5 by 6 inches) and is lightweight (5 pounds), but provides a 1-by-2.5-inch marking area that’s suitable for most applications. All text (single or multiple lines) and graphics are automatically centered during marking, whether in the X, Y or both axes. This capability ensures accurate marking of round parts such as pipes.
All Kwik Mark products have the iTeach function, which lets the operator use the marking tip as a pointer to accurately mark text on a radius, an angle, within a defined area or in several defined locations. For radius text, the operator touches any three points along an arc or hole, and then the machine automatically figures out the radius, and starting and ending angles, before placing the text on this radius.
Scribe marking involves pushing the stylus into the metal, and then dragging the stylus through the material. Because scribing requires greater force than dot-peening, the scribe machine is bigger, non-portable and features a larger motor.
The Silent Scribe version of CMT’s I-MARK Series dot-peen system marks up to four characters per second. Ballscrew-driven, the system comes with two marking window options (medium and large size), and it is unique identification (UID) and 2D Square-Dot compatible. Its I-Mark controller is compact and easily integrates with production equipment.
Communication options for the controller include remote programming over LAN, and operational controls via I/O, Modbus, serial and Ethernet IP. Users can upgrade the controller with a 17-inch touch screen monitor. A pedestal mount is optional.
Some manufacturers prefer to equip their CNC machines with dot-peen or scribe styluses rather than purchase separate equipment. This approach is quite popular among firearms manufacturers.
Several use the MLCube machine from DATRON Dynamics Inc. for engraving long guns. The machine’s 60-by-40-inch travel range can be equipped with a pneumatic clamping system for workholding.
Durable Technologies’ DuraDot attachment creates alphanumeric characters, logos and other types of markings. The spindle-actuated marker easily integrates into vertical or horizontal machines, and can be manually loaded or traversed through automatic tool changer processes.
Etch a Stencil
Aerospace and electronics manufacturers often use electrochemical etching to mark their products. This method involves pressing an electrolyte-soaked electrode on a stencil that is placed over the part. When current is sent through the stencil, material under the stencil dissolves and creates a mark. The longer the current is present, the deeper the mark.
Dry etching is performed in a similar manner, but with fine abrasive grit that is blown through a stencil. This process marks metals with hard, anodized or highly polished surfaces, such as hand tools or bathroom fixtures. It produces a frosted impression.
Electrochemical etching produces very sharp markings with crisp edges up to 0.006 inch deep. Equally important, it easily burns through heat-treated metal above HRC 60, and does not weaken the physical or chemical properties of the part. The latter benefit makes this method a good choice when marking fragile and thin-walled parts, such as PCBs.
On the downside, electrochemical etching only marks conductive surfaces and is only cost-effective when repeatedly producing the same mark. It uses consumables, as the stencil eventually wears out and must be replaced. Also, assemblers need to be careful when handling the hazardous acid, and the process is difficult to automate because it requires several steps.
Just on the Surface
Surface marking involves directly applying ink to the metal rather than removing any of the surface material. The ink can be applied in one of several ways.
For parts that require a simple dot, a refillable, felt-tip marker mounted to a pneumatic cylinder may suffice. When multiple small dots are needed, they can be applied with a pneumatic spray valve.
A pad printer is ideal for contoured, textured and complex markings on stainless steel, and bare, anodized, painted or powder-coated metal. This method involves etching an image into a cliché plate, flooding it with a solvent-based ink and scraping off the excess. A silicone pad is pressed onto the plate and then the part. The ink comes off the pad and sticks to the part’s surface.
For serial marking applications, a continuous ink-jet system is necessary. Within the system’s printhead, a fine jet of pressurized ink is broken up into a stream of separate drops having an electrostatic charge. The flight direction of each drop varies with the size of the charge. Ink drops not required for printing are not given electrostatic charges and are collected in a gutter for recycling.
“Ink printing is usually not as permanent as engraving, but a wide range of inks are specifically formulated to last longer on metal by resisting solvents and caustic chemicals,” explains John Folkers, chief technical officer of the R&D group at Videojet Technologies. “Durable red, blue and white inks provide high contrast for codes and other markings. In addition, ink-based marking systems easily integrate into production lines and pose few safety concerns for workers.”
The 1710 continuous ink-jet printer from Videojet is designed for applications that require easily readable variable data on dark surfaces. The printer uses pigmented inks to create high contrast, clean codes on many common and difficult-to-mark materials in aerospace manufacturing, such as coated and bare metals. Folkers says Videojet recommends a black opaque or white ink be used with the printer for marking metal parts due to the ink’s excellent adhesion and lightfastness. The white ink contains heavy pigments and provides high contrast on parts like brake pads.
Beaming With Pride
When the application calls for high-volume part marking, a laser-based system is the best choice. These systems use one of several types of lasers—carbon dioxide (CO2), ytterbium fiber (Yb: fiber), neodymium-doped yttrium aluminum garnet (Nd: YAG), and neodymium-doped yttrium orthovanadate (YVO4) with infrared, green or ultraviolet (UV) outputs—to precisely mark steel, stainless steel, anodized aluminum, brass, copper and titanium.
The laser is focused onto the metal surface to create a mark either through engraving, annealing or removing part of the surface. Laser engraving vaporizes the surface material. Annealing changes the color of the metal to create a contrasting mark. The surface removal process is used on multilayer materials such as anodized aluminum.
Lasers can mark any character or image that can be created or imported into CAD-based or graphics software programs like Illustrator and Corel Draw. This capability, coupled with the fact that these systems use no consumables and offer superior speeds, helps account for the increasing popularity of laser marking.
Small yet powerful, the Videojet 7610 system uses a 100-watt Yb: fiber laser to produce crisp, clear codes at up to 600 meters per minute on aluminum and stainless steel parts. Its precision scan head delivers consistent high-quality codes across the entire marking window, which is large to increase throughput and maximize productivity. Marking can be performed on moving or stationary parts, according to Folkers. The air-cooled laser source requires little maintenance and has a life expectancy up to 100,000 hours.
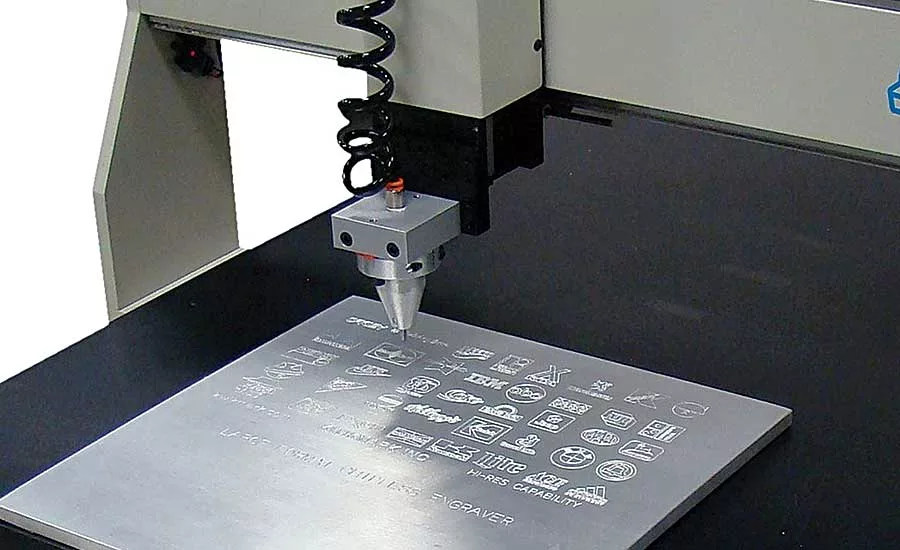
Both the desktop and linear versions of the Samurai UV laser marking system from DPSS Lasers Inc. offer a large work area and high repetition rates. The system’s 355-nanometer-UV-wavelength laser provides a small beam spot size with a large depth of focus, resulting in damage-free and permanent markings on various metals. Applications range from product coding and micromachining on medical devices and aerospace parts, to sapphire scribing and indium-tin oxide removal. One-, 2- and 3-watt models are available in both versions. Other features can include a Class 1 enclosure that meets FDA safety guidelines, a large front door for access to the work area, and intuitive control software that lets users go from design to marking within minutes of system start-up.
“Most of our customers want the laser to produce a photochemical reaction on the metal surface without actually engraving or damaging it,” explains Allie Constantino, marketing manager at DPSS Lasers. “On stainless steel parts, our UV laser creates double-carbon bonds on the surface and high-resolution markings that are permanent.”
In 2017, CMT developed its Black-Out workstation that uses the backside of a fixtured metal part to also serve as an enclosure side during laser marking. Side pressure sensors confirm that the part is properly fixtured before laser marking begins. A special nosepiece is used to securely hold conical-shaped parts.
Krembel says that automotive manufacturers often use the workstation because it lessens downtime between laser marking projects. Other station features include full perimeter guarding, a light curtain for safe manual part loading, laser controllers, a machine control panel and adjustable leveling feet.
Looking for a reprint of this article?
From high-res PDFs to custom plaques, order your copy today!


