Troubleshooting the MIG Welding Process
These tips and tricks will help you solve common MIG welding problems.
Like any welding process, MIG welding has its complications. Even so, there is no reason to let common problems slow you down. With a bit of knowledge and some solid troubleshooting skills, you can easily find the right solution to get back to welding-sooner than later. The following guidelines will help you along the way.
Keep Covered
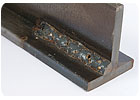
Porosity occurs when a gas pocket becomes caught in the weld puddle. This discontinuity can appear at a specific point on the weld or along its full length. It can occur on the surface of the weld or inside it. Regardless of the location, the result is always the same: a weaker weld.
Inadequate shielding gas coverage is one of the most common causes of porosity. To correct this problem, first check the regulator or flow meter for adequate gas flow, increasing it if necessary, and check the gas hoses and gun for leaks. Whether welding inside or outside, shield the arc and weld puddle from drafts with a welding screen.
Next, confirm that the MIG gun nozzle is large enough for the application. Too small of a nozzle will not provide sufficient flow of the shielding gas. Keep the nozzle 0.25 to 0.5 inch away from the workpiece, make certain it is free of spatter, and always use the correct contact tip recess. Slow your travel speed and hold the MIG gun near the bead at the end of the weld until the molten metal solidifies; pulling the gun away too soon can interrupt gas coverage and leave the setting weld vulnerable to the atmosphere.
Additional causes of porosity include:
- Using the wrong gas. Always use a welding-grade shielding gas appropriate for the base metal and filler metal.
- Using too much or the wrong type of anti-spatter treatment. Use the correct amount and type for your application.
- Extending the welding wire too far out of the nozzle. The wire should extend no more than 0.5 inch beyond the nozzle.
Impurities in the base metal, such as sulfur and phosphorous in steel, or a dirty base metal can also cause porosity. If specifications allow, consider changing to a different composition of base metal, and always remove rust, grease, paint, coatings, oil, moisture and dirt prior to welding. Filler metals with added deoxidizers can help to “clean” the weld, but should never be solely relied upon to minimize porosity.
Finally, replace any wet or contaminated shielding cylinders immediately.
Don't Be Undercut
Undercutting occurs when a groove melts into the base metal next to the toe of the weld and the weld metal fails to fill that area. This discontinuity weakens the toe of the weld, increasing the chances of cracking. Correcting the problem is relatively simple: reduce the welding current, decrease the welding arc voltage, and adjust your MIG gun angle toward the joint. Reduce your travel speed so the weld metal completely fills the melted-out areas of the base metal. When using a weaving technique, pause slightly at each side of the weld bead.
When the weld metal fails to completely fuse with the base metal or with the preceding weld bead in multipass applications, incomplete fusion can occur. Some people refer to this problem as lack of fusion. Generally, an incorrect MIG gun angle is the cause and you should adjust it accordingly.
Follow these steps:
- Place the stringer bead near the correct point on the joint, adjusting the work angle or widening the groove as needed to access it fully.
- Keep the arc on the leading edge of the weld puddle by maintaining an angle of 0 to 15 degrees.
- If using a weaving technique, momentarily hold the arc on the groove sidewall.
If correcting the MIG gun angle does not remedy incomplete fusion, look to see if the weld puddle is too far ahead of the wire. If so, increase your travel speed, the welding current or both to correct the problem. Conversely, if you suspect insufficient heat input has caused incomplete fusion, select a higher voltage range and adjust the wire feed speed as necessary. Finally, always clean the surface of the base metal prior to welding to remove contaminants that may prevent the metal from fusing together.
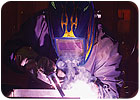
Spatter Matters
Another common MIG welding problem-spatter-occurs when the weld puddle expels molten metal and scatters it along the weld bead; this molten metal then cools and forms a solid mass on the workpiece. Excessive spatter not only creates a poor weld appearance, but it can also lead to incomplete fusion in multiple welding pass applications.
Spatter can be produced if the wire is fed too quickly, the voltage setting is too high, or the wire extends too far. Adjusting these parameters will help.
Like porosity, insufficient shielding gas and dirty base materials can also cause spatter. As necessary, increase the flow of shielding gas at the regulator and minimize drafts near the welding arc. Clean and dry the welding wire, and remove all grease, dirt and other contaminants from the base metal.
Other factors that can cause spatter include: the wrong size contact tip, a worn contact tip or the wrong tip-to-nozzle recess. Be certain you have the right contact tips, nozzles and recess parameters for the application.
Keep Track of the Heat
Excessive penetration occurs when the weld metal melts through the base metal and hangs underneath the weld. Excessive heat input is usually to blame for the problem. To correct this, select a lower voltage range, reduce the wire feed speed and increase your travel speed.
Conversely, insufficient heat input can cause lack of penetration, or the shallow fusion between the weld metal and the base metal. Increasing wire feed speed, boosting the voltage range, and reducing travel speed are all viable remedies. Preparing the joint correctly also helps prevent lack of penetration-the preparation and design should permit access to the bottom of the groove and allow you to maintain correct stick-out and arc characteristics.
All About Wire
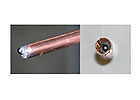
Wire feed stoppages and wire feed system malfunctions can adversely affect the welding arc and create irregularities that may weaken the weld bead. Bird nests-a tangle of wire that halts the wire from being fed-is a common problem. You can resolve bird nests by flipping up the drive roll and pulling the wire back out of the gun. Next, trim the affected wire and rethread it through the feeder and back to the gun. If the welding specifications allow, decrease the drive roll tension, use a larger diameter wire and reduce the distance the wire feeds to minimize the chance of bird nests.
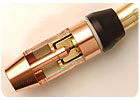
Burn back is also very common. It results when a weld forms in the contact tip. It usually occurs when the wire is fed too slowly or the MIG gun is held too close to the base metal. To correct burn back, increase the wire feed speed and lengthen the distance of the MIG gun from the workpiece. The nozzle should be no further than 0.5 inch from the metal. Replace burn back-damaged contact tips by removing the nozzle and the tip (it may be melted to the wire). Then, snip the wire, install the new tip and replace the nozzle with one that has the appropriate tip recess for the application.
Other causes of wire feeding problems include liner blockages, poorly trimmed liners (too short, burred, or pinched), or the wrong size liner. To remedy these problems, replace any liner if you find a blockage, always trim the liner according to the manufacturer’s direction, and be certain you are using the correct size liner for the welding wire diameter.
Remember, quality MIG welds result not only from good welding technique, but also your ability to identify and solve problems quickly if they do occur. Continue arming yourself with basic information, and you’ll be able to tackle most problems associated with MIG welding without sacrificing time or quality.
For reprints of this article, please contact Cindy Williams at williamsc@bnpmedia.com or 610-436-4220 ext. 8516.
Looking for quick answers on assembly and manufacturing topics? Try Ask ASM, our new smart AI search tool. Ask ASM
Looking for a reprint of this article?
From high-res PDFs to custom plaques, order your copy today!


