Simple Test Determines Cause of Loose Fasteners
The type of loosening affecting a bolted joint can be determined by examining the position of the torque stripe after testing and retightening
Bolted joints are widely used to assemble components. That is not surprising, since they are cost effective while being relatively easy to assemble and disassemble. Bolted joints are extremely reliable through the life of the product—as long as the bolt remains tight. Unfortunately, bolts often loosen when placed in service, and they can become a source reliability problems.
Bolt loosening can be due to relaxation, self-loosening, or a combination of both.
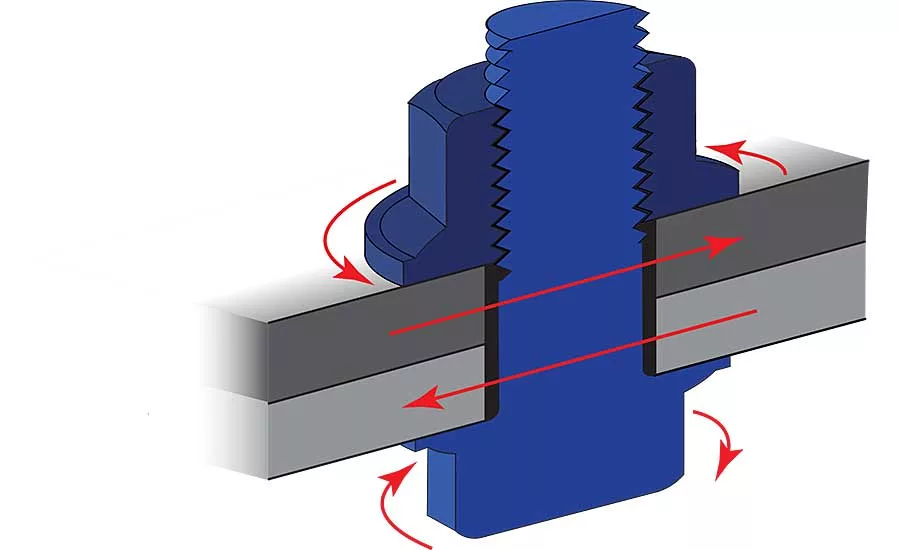
Self-loosening is the process in which the external and internal threads rotate counterclockwise relative to each other due to external loading. This type of loosening is usually triggered by repeated slipping of the joint due to reversing shear loads. In extreme cases, it is possible for the bolt to self-loosen completely, and for the bolt to fall out altogether.
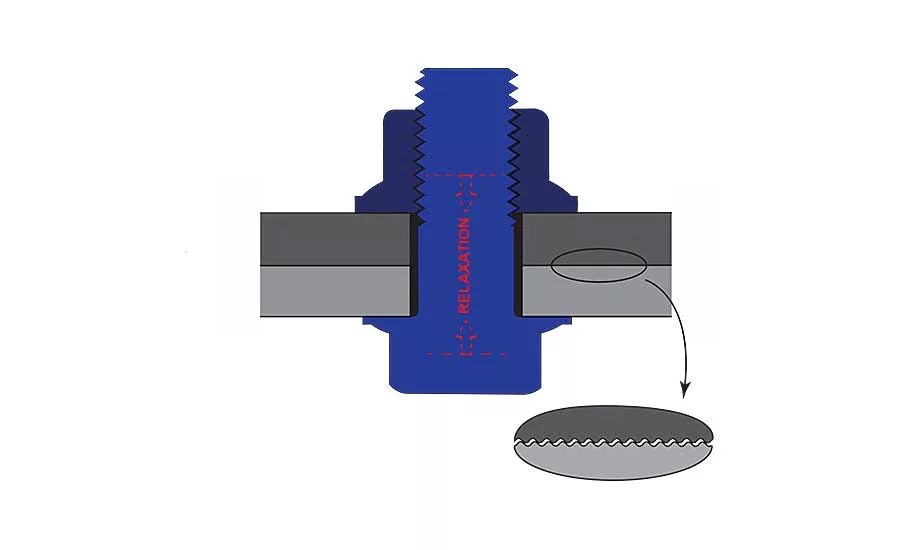
Relaxation is the process where the external and internal threads do not rotate and yet the bolt still loosens. This type of loosening is usually caused by the plastic flattening, or embedment of the load bearing surfaces. The surfaces of the joint interface and fastener threads appear to be smooth. Yet under a microscope, it becomes apparent that the surfaces consist of asperities. When the mating surfaces are brought together to create the joint, the asperities make contact and plastically deform. While a majority of the relaxation occurs during the tightening process, it also continues after the bolt is tightened and during the initial loading cycles. Since most bolted joints are not retightened after the initial assembly, the relaxation that happens in service results in loosening.
Product Testing
Products are commonly tested under simulated or actual service conditions, and loose bolts are frequently discovered after the test. When loose bolts are discovered, it is important for the engineer to understand the type of loosening that occurred. This information can be used to guide the engineer to make design changes or choose a thread-locking method, such as a wedge lock washer or an adhesive threadlocker, that will prevent the joint from loosening when it is placed in service.
Many companies require assemblers to mark the head of the bolt or the nut with a paint stripe, otherwise known as a torque strip or witness mark, to attest that the bolt was tightened to the proper torque value. This technique is a valuable quality assurance step, but what is not widely known is that torque stripes can also be used to detect the type of bolt loosening that occurred during a test—if the paint stripe is extended to include the joint.
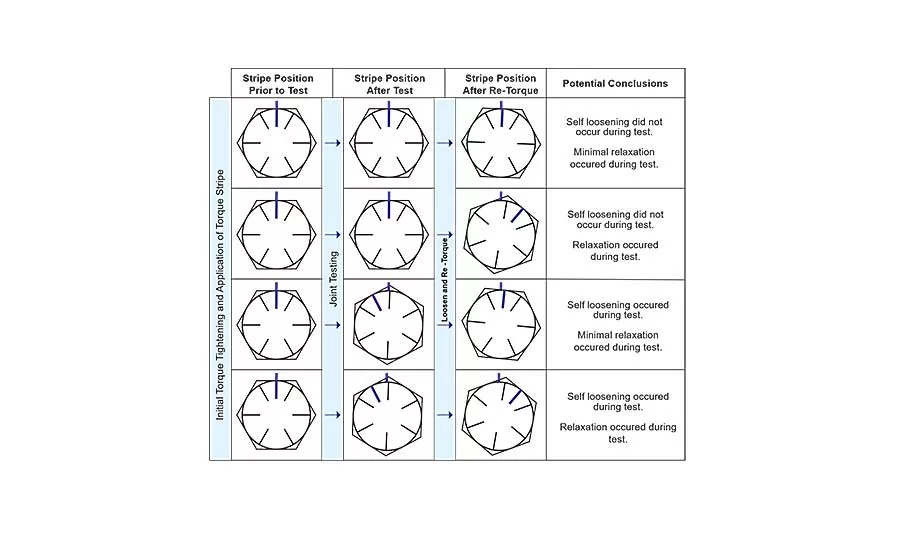
Self-loosening can easily be detected after the test by looking for evidence that there was relative counterclockwise movement between the internal and external threads (see table).
Looking for quick answers on assembly and manufacturing topics? Try Ask ASM, our new smart AI search tool. Ask ASM
A qualitative measurement of relaxation in the bolted joint can also be made using torque stripes, if the bolt is retightened to the original torque value after the test. If the torque stripe shows relative clockwise movement between the internal and external threads after retightening, it is likely relaxation occurred during the test.
Note: To improve the accuracy of this technique, the threads, bolt, and nut flange should be lubricated prior to assembly and a calibrated torque wrench should be used to tighten the bolt or nut.
The following simple test procedure can be used to identify self-loosening and relaxation in a bolted joint.
- Prior to assembling, lubricate the threads and the rotating, load-bearing surfaces of the nut and bolt.
- Assemble and tighten the nut and bolt to the recommended (lubricated) torque value using a calibrated torque wrench.
- Using a paint marker, apply the torque stripe to each nut or bolt. The stripe should extend from the nut or bolt head, over the washer and to the joint.
- Test the joint for loosening in simulated or actual service conditions.
- Observe and record the angle of relative counterclockwise movement between the internal and external threads.
- Loosen the nut or bolt approximately 30 degrees and retighten the fastener to the same torque value used in step 2, using a calibrated torque wrench.
- Observe and record the angle of relative clockwise movement between the internal and external threads.
- The type of loosening which occurred during the test can be determined using the table.
Understanding whether a bolt loosened due to self-loosening, relaxation or a combination of both is critical for making the right design changes or choosing the best thread locking method. Fortunately, a simple torque stripe can used to detect the type of bolt loosening that occurred.
For more information, call 952-843-2729 or visit www.matrixengrg.com.
Looking for a reprint of this article?
From high-res PDFs to custom plaques, order your copy today!


